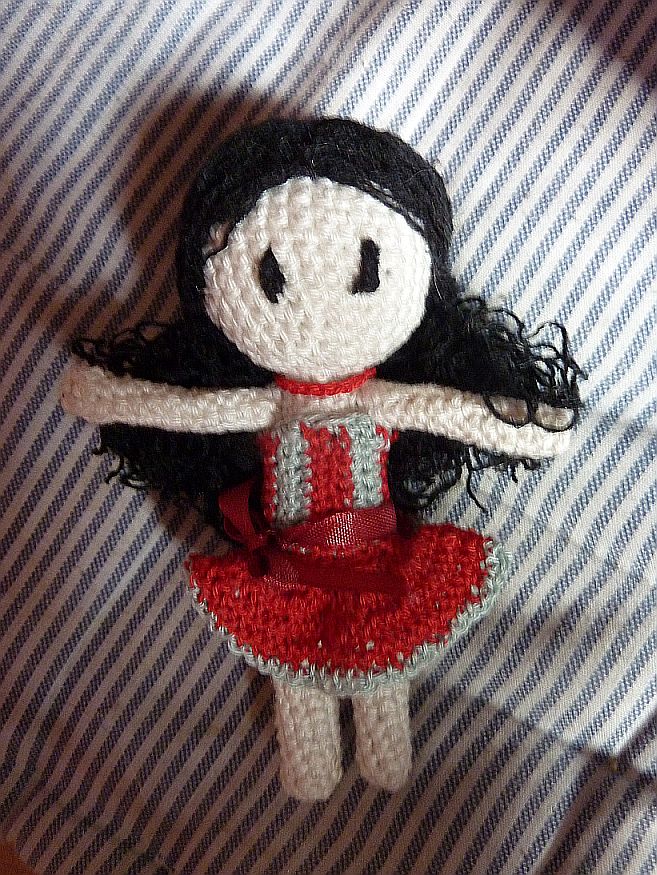
Here's a pattern I made in April. Easy and fun to make!

Materials needed:
- tan, black and white yarn. Also, some wool for hair.
- red felt for decoration
- some ribbons, little roses etc.
mr - magic ring (adjustable ring)
sc - simple crochet
dec - decrease (sc2tog, 2 stitches together)
inc - increase (2 sc in one st)
*...* - repeat the steps from between the asterisks around.
sl st - slip stitch
sk - skip

THE BRIDE
HEAD:
1. mr, 5 sc in ring (5)
2. inc around (10)
3. *sc, inc* (15)
4. *2 sc, inc* (20)
5. *3 sc, inc* (25)
6. *4 sc, inc* (30)
7. *5 sc, inc* (35)
8. - 15. sc in each st around. (35)
16. *5 sc, dec* (30)
17. *4 sc, dec* (25)
18. *3 sc, dec* (20)
19. *2 sc, dec* (15)
end with sl st. cut off yarn, leaving a long tail for sewing later.
BODY: (starting with 2 legs)
in white:
1. mr, 5 sc in ring (5)
2. inc around (10)
3. *sc, inc* (15)
Change yarn to tan
4. -16. sc in each st around (15)
sl st. cut off yarn.
When you finish making the second leg, do not cut off the yarn. Hold both legs together and keep working on the other leg. This is how the legs are joined. You will be now working in round on top of both legs.
stuff legs and hold them together. Now you will be working on top of both legs.
1. - 4. sc in each st around (30)
5. 13 sc, dec, 13 sc, dec (28)
6. - 7. sc around (28)
change to white
8. 12 sc, dec, 12 sc, dec (26)
9. sc around (26)
10. 11 sc, dec, 11 sc, dec (24)
11. 10 sc, dec, 10 sc, dec (22)
12. - 13. sc around (22)
14. 9 sc, dec, 9 sc, dec (20)
15. 8 sc, dec, 8 sc, dec (18)
16. sc around (18)
- stuff
17. 7 sc, dec, 7 sc, dec (16)
18. 6 sc, dec, 6 sc, dec (14)
19. 5 sc, dec, 5 sc, dec (12)
- stuff more
20. 4 sc, dec, 4 sc, dec (10)
21. sc around (10)
- stuff completely. do not sew the top of the body. Make a sl st and fasten off.
Do not sew head to the body right now.
ARMS:
with white
1. mr, 5 sc in ring (5)
2. inc around (10)
3. - 6. sc (10)
7. dec, 8 sc (9)
8. - 9. sc around (9)
10. dec, 7 sc (8)
11. - 13. sc around (8)
change to tan
14. - 17. sc around (8)
18. 4 dec. (4)
fasten off. leave long tail for sewing.
THE GROOM:
HEAD:
1. mr, 5 sc in ring (5)
2. inc around (10)
3. *sc, inc* (15)
4. *2 sc, inc* (20)
5. *3 sc, inc* (25)
6. *4 sc, inc* (30)
7. *5 sc, inc* (35)
8. - 15. sc in each st around. (35)
16. *5 sc, dec* (30)
17. *4 sc, dec* (25)
18. *3 sc, dec* (20)
19. *2 sc, dec* (15)
end with sl st. cut off yarn, leaving a long tail for sewing later.
BODY: (starting with 2 legs)
in black
1. mr, 5 sc in ring (5)
2. inc around (10)
3. *sc, inc* (15)
4. - 8. sc in each st around (15)
9. -16. sc in each st around (15)
sl st. cut off yarn.
When you finish making the second leg, do not cut off the yarn. Hold both legs together and keep working on the other leg. This is how the legs are joined. You will be now working in round on top of both legs.
stuff legs and hold them together. Now you will be working on top of both legs.
1. - 4. sc in each st around (30)
5. 13 sc, dec, 13 sc, dec (28)
6. - 7. sc around (28)
change to white
8. 12 sc, dec, 12 sc, dec (26)
9. sc around (26)
10. 11 sc, dec, 11 sc, dec (24)
11. 10 sc, dec, 10 sc, dec (22)
12. - 13. sc around (22)
14. 9 sc, dec, 9 sc, dec (20)
15. 8 sc, dec, 8 sc, dec (18)
16. sc around (18)
- stuff
17. 7 sc, dec, 7 sc, dec (16)
18. 6 sc, dec, 6 sc, dec (14)
19. 5 sc, dec, 5 sc, dec (12)
- stuff more
20. 4 sc, dec, 4 sc, dec (10)
21. sc around (10)
- stuff completely. do not sew the top of the body. Make a sl st and fasten off.
Do not sew head to the body right now.
ARMS:
with tan
1. mr, 5 sc in ring (5)
2. inc around (10)
3. - 5. sc (10)
change to black
6. sc (10)
7. dec, 8 sc (9)
8. - 9. sc around (9)
10. dec, 7 sc (8)
11. - 13. sc around (8)
14. - 19. sc around (8)
20. 4 dec. (4)
fasten off. leave long tail for sewing.
For the groom, it's best to embroider his hair on the head. I made a tutorial HERE.
For the bride, it's best to attach some strands and make her a nice hairdress.
Hope you'll have fun making them!

Materials needed:
- tan, black and white yarn. Also, some wool for hair.
- red felt for decoration
- some ribbons, little roses etc.
mr - magic ring (adjustable ring)
sc - simple crochet
dec - decrease (sc2tog, 2 stitches together)
inc - increase (2 sc in one st)
*...* - repeat the steps from between the asterisks around.
sl st - slip stitch
sk - skip

THE BRIDE
HEAD:
1. mr, 5 sc in ring (5)
2. inc around (10)
3. *sc, inc* (15)
4. *2 sc, inc* (20)
5. *3 sc, inc* (25)
6. *4 sc, inc* (30)
7. *5 sc, inc* (35)
8. - 15. sc in each st around. (35)
16. *5 sc, dec* (30)
17. *4 sc, dec* (25)
18. *3 sc, dec* (20)
19. *2 sc, dec* (15)
end with sl st. cut off yarn, leaving a long tail for sewing later.
BODY: (starting with 2 legs)
in white:
1. mr, 5 sc in ring (5)
2. inc around (10)
3. *sc, inc* (15)
Change yarn to tan
4. -16. sc in each st around (15)
sl st. cut off yarn.
When you finish making the second leg, do not cut off the yarn. Hold both legs together and keep working on the other leg. This is how the legs are joined. You will be now working in round on top of both legs.
stuff legs and hold them together. Now you will be working on top of both legs.
1. - 4. sc in each st around (30)
5. 13 sc, dec, 13 sc, dec (28)
6. - 7. sc around (28)
change to white
8. 12 sc, dec, 12 sc, dec (26)
9. sc around (26)
10. 11 sc, dec, 11 sc, dec (24)
11. 10 sc, dec, 10 sc, dec (22)
12. - 13. sc around (22)
14. 9 sc, dec, 9 sc, dec (20)
15. 8 sc, dec, 8 sc, dec (18)
16. sc around (18)
- stuff
17. 7 sc, dec, 7 sc, dec (16)
18. 6 sc, dec, 6 sc, dec (14)
19. 5 sc, dec, 5 sc, dec (12)
- stuff more
20. 4 sc, dec, 4 sc, dec (10)
21. sc around (10)
- stuff completely. do not sew the top of the body. Make a sl st and fasten off.
Do not sew head to the body right now.
ARMS:
with white
1. mr, 5 sc in ring (5)
2. inc around (10)
3. - 6. sc (10)
7. dec, 8 sc (9)
8. - 9. sc around (9)
10. dec, 7 sc (8)
11. - 13. sc around (8)
change to tan
14. - 17. sc around (8)
18. 4 dec. (4)
fasten off. leave long tail for sewing.
THE GROOM:
HEAD:
1. mr, 5 sc in ring (5)
2. inc around (10)
3. *sc, inc* (15)
4. *2 sc, inc* (20)
5. *3 sc, inc* (25)
6. *4 sc, inc* (30)
7. *5 sc, inc* (35)
8. - 15. sc in each st around. (35)
16. *5 sc, dec* (30)
17. *4 sc, dec* (25)
18. *3 sc, dec* (20)
19. *2 sc, dec* (15)
end with sl st. cut off yarn, leaving a long tail for sewing later.
BODY: (starting with 2 legs)
in black
1. mr, 5 sc in ring (5)
2. inc around (10)
3. *sc, inc* (15)
4. - 8. sc in each st around (15)
9. -16. sc in each st around (15)
sl st. cut off yarn.
When you finish making the second leg, do not cut off the yarn. Hold both legs together and keep working on the other leg. This is how the legs are joined. You will be now working in round on top of both legs.
stuff legs and hold them together. Now you will be working on top of both legs.
1. - 4. sc in each st around (30)
5. 13 sc, dec, 13 sc, dec (28)
6. - 7. sc around (28)
change to white
8. 12 sc, dec, 12 sc, dec (26)
9. sc around (26)
10. 11 sc, dec, 11 sc, dec (24)
11. 10 sc, dec, 10 sc, dec (22)
12. - 13. sc around (22)
14. 9 sc, dec, 9 sc, dec (20)
15. 8 sc, dec, 8 sc, dec (18)
16. sc around (18)
- stuff
17. 7 sc, dec, 7 sc, dec (16)
18. 6 sc, dec, 6 sc, dec (14)
19. 5 sc, dec, 5 sc, dec (12)
- stuff more
20. 4 sc, dec, 4 sc, dec (10)
21. sc around (10)
- stuff completely. do not sew the top of the body. Make a sl st and fasten off.
Do not sew head to the body right now.
ARMS:
with tan
1. mr, 5 sc in ring (5)
2. inc around (10)
3. - 5. sc (10)
change to black
6. sc (10)
7. dec, 8 sc (9)
8. - 9. sc around (9)
10. dec, 7 sc (8)
11. - 13. sc around (8)
14. - 19. sc around (8)
20. 4 dec. (4)
fasten off. leave long tail for sewing.
For the groom, it's best to embroider his hair on the head. I made a tutorial HERE.
For the bride, it's best to attach some strands and make her a nice hairdress.
Hope you'll have fun making them!